Wedding photography is an enchanting craft that extends beyond capturing fleeting moments; it encompasses the skill of post-processing to elevate visual storytelling. The process of editing wedding photos holds the power to transform ordinary snapshots into captivating works of art. Regardless of whether you’re embarking on your photographic journey as a beginner or have reached an intermediate level, the mastery of editing is pivotal in crafting stunning wedding albums. In this comprehensive article, we’ll walk you through the fundamentals of Wedding Photo Editing.
Grasping the Significance of Editing
Editing isn’t just about rectifying errors; it’s about amplifying the beauty and emotions captured within your photographs. Wedding photographs often demand meticulous attention due to varying lighting conditions, the unpredictability of events, and the aspiration to create a cohesive and visually pleasing narrative.
Here are some compelling reasons that underscore the importance of editing in wedding photography:
- Elevating Visual Appeal: Editing can rectify exposure irregularities, eliminate distractions, and draw out the vibrance and sentiments encapsulated in your photographs.
- Ensuring Uniformity: Editing guarantees that all the images within a wedding album share a consistent look and ambiance, thus crafting a unified storytelling experience.
- Unleashing Creative Expression: Editing provides the avenue to infuse your unique touch, experiment with diverse styles, and craft distinctive aesthetics for wedding photos.
- Client Satisfaction: Delivering professionally edited images leaves an indelible impression on clients, often leading to referrals and repeat business.
With that foundation, let’s embark on the journey to edit wedding photos effectively.
Step 1: Organize Your Photo Collection
Prior to diving into the editing process, it’s imperative to organize your wedding photos. Create a structured folder system with subcategories for various segments of the event, such as “Pre-Ceremony,” “Ceremony,” “Reception,” and so forth. This meticulous organization streamlines your workflow and keeps your progress on track.
Step 2: Cherry-Pick the Finest Shots
Remember, not every photo you snap will find its place in the final album. Thoroughly assess and select the most compelling shots from each phase of the wedding, with a focus on those that narrate a story or evoke emotions. Quality should always take precedence over quantity.
Step 3: Discerning the Best Through Culling
Culling involves the process of picking the cream of the crop from your selection. Employ software tools such as Adobe Lightroom or Capture One to rate and categorize your images. Discard the unusable shots to save time during the editing process.
Step 4: Preliminary Adjustments
Commence your editing journey with preliminary adjustments, including:
- Exposure: Rectify overexposed or underexposed images.
- Contrast: Amplify contrast to make your photos visually engaging.
- White Balance: Adjust temperature and tint to achieve lifelike colors.
- Cropping: Crop to enhance composition and remove distractions.
Step 5: Color Refinement
Color correction plays a pivotal role in attaining a harmonious look throughout the album. Utilize the HSL (Hue, Saturation, Luminance) panel in your editing software to fine-tune individual colors.
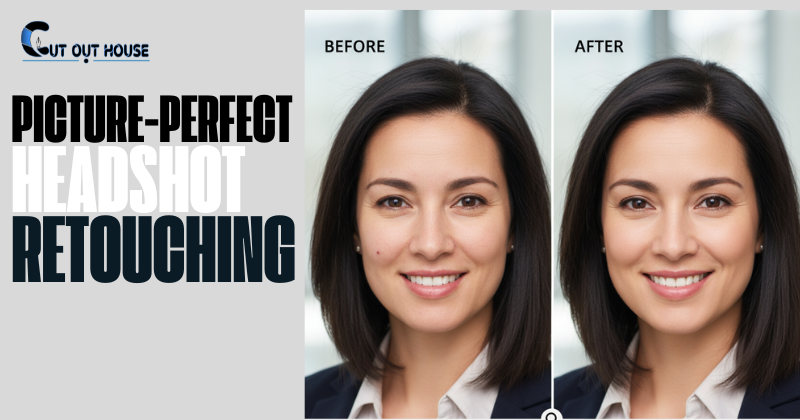
Step 6: Retouching and Skin Enhancement
For portraits, especially close-ups, employ retouching tools to eliminate blemishes and imperfections. Approach skin smoothing techniques judiciously to preserve a natural appearance.
Step 7: Unleash Creative Flair
This phase enables you to infuse your artistic essence. Experiment with diverse presets, filters, and effects to forge a distinctive style for the wedding album. Exercise restraint to avoid excessive alterations; subtlety often yields the most exquisite results in wedding photography.
Step 8: Exporting for Delivery
Upon achieving satisfaction with your edits, export the images in the appropriate file format and resolution to cater to your clients’ needs. JPEG serves as the standard format for sharing, while TIFF or RAW formats may be requisite for printing purposes.
Step 9: Safeguard Your Work
Maintain backups of your edited photos in multiple locations to guarantee the security of your efforts.
Step 10: Embrace Feedback and Perpetual Learning
Share your edited photos with fellow photographers or clients to gain valuable feedback. The path to improvement involves perpetual learning. Numerous online tutorials and courses dedicated to wedding photo editing exist to help you hone your skills continuously.
Conclusion
Wedding Photo Editing represents a skill that matures with time, practice, and unwavering dedication. Whether you’re commencing your photographic journey or have attained intermediate proficiency, mastering post-processing is imperative for crafting captivating wedding albums. Keep in mind that editing isn’t solely about rectifying imperfections; it’s about amplifying the beauty and emotions encapsulated in those precious moments. Equipped with the right techniques and a touch of creativity, you can transmute ordinary images into cherished memories that endure for generations. So, seize your camera and embark on the journey of immortalizing magical moments, knowing that the art of editing stands ready to render them eternally unforgettable.