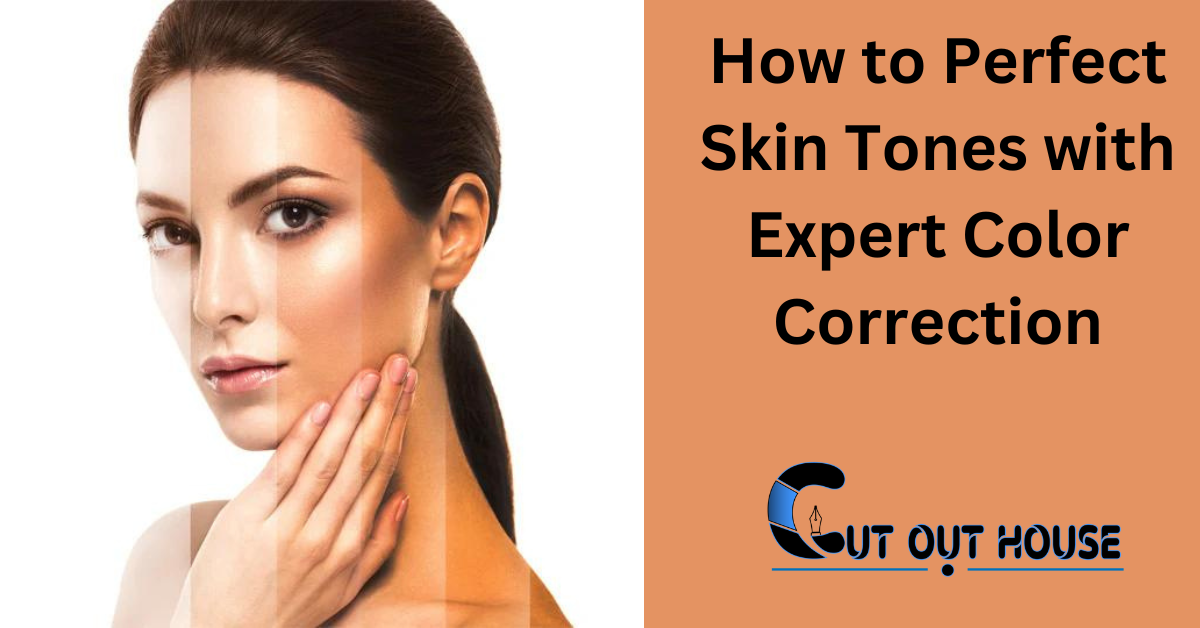
To correct skin tones, use color correction tools in Photoshop to adjust the red, yellow, or blue color channels. By making subtle slider movements, you can achieve the desired skin tones in your image.
Correcting skin tones using color correction tools is essential for achieving accurate and natural-looking results in portrait photography. Whether you’re a professional photographer or an enthusiast, understanding how to use color correction tools effectively can greatly enhance the quality of your images.
Adjusting specific color channels and making subtle tweaks can achieve the perfect skin tones that complement your subjects’ natural complexion. In this guide, we’ll explore the techniques and methods for correcting skin tones using color correction tools in Photoshop. Understanding the nuances of color correction will empower you to create stunning and true-to-life portraits that captivate viewers.
The Importance Of Skin Tone In Visual Media
Skin tone is a crucial aspect of visual media, and achieving accurate skin tones can be challenging. The importance of skin tone lies in the fact that it conveys emotions, sets the mood, and helps create a connection with the audience. Inaccurate skin tones can ruin the entire visual experience and impact the message you are trying to convey.
One common challenge in achieving perfect skin tones is the presence of various skin tones in a single image. Each skin tone requires a different approach, and it can be challenging to ensure each one looks natural. Lighting conditions, camera settings, and post-processing techniques can also affect skin tones.
To correct skin tones, color correction tools in programs like Photoshop or Premiere Pro can be used. Techniques such as adjusting the white balance, adding warmth, and selective color adjustment can help achieve accurate skin tones. For redness, neutralizing with a green color corrector can be helpful, while a peach color corrector can help with dark circles and dark spots. To balance sallowness, a lavender color corrector is useful.
Overall, understanding the importance of skin tone in visual media and using appropriate color correction tools can help achieve accurate and natural-looking skin tones, enhancing the visual experience for the audience.
Basics Of Color Theory For Skin Tones
When it comes to correcting skin tones using color correction tools, it is essential to understand the basics of color theory. Color balance plays a crucial role in achieving accurate skin tones. Primary and secondary colors are key elements in color theory that affect the overall balance and appearance of skin tones.
In color theory, primary colors, such as red, blue, and yellow, are the foundation for all other colors. Secondary colors, like orange, green, and purple, are created by mixing primary colors. Understanding the relationship between primary and secondary colors helps in adjusting the color balance of skin tones.
By using color correction tools, you can neutralize specific undertones and achieve a more natural skin tone. For example, if you have redness in the skin, a green color corrector can help neutralize it. For dark circles or spots, using a peach or orange color corrector can help balance the tone. Additionally, a lavender color corrector can counteract sallowness in the skin.
Tools For Color Correction
Color correction tools are essential for achieving correct skin tones in images. Vectorscope and waveform monitors help analyze and adjust color levels. LUTs offer predefined color adjustments that can be applied to enhance skin tones. Selective color adjustment layers enable targeted editing for specific areas of the skin.
Color Correcting For Different Skin Tones
Discover how to correct skin tones using color correction tools for different skin tones. Learn techniques for adjusting white balance, adding warmth, and using selective color adjustment layers to achieve the perfect skin tone in Photoshop. Enhance your photos and achieve natural-looking results with these simple and effective color correction methods.
| Neutralizing specific discolorations | When correcting fair skin tones, use a peach color corrector for dark circles and dark spots. For medium to dark complexions, opt for a deeper orange shade. To balance out unwanted warmth, use a lavender color corrector for sallowness. |
| Adjusting for fair, medium, and dark complexions | When correcting skin tones in Photoshop, select the Red, Yellow, or Blue color channels in the Selective Color panel. Adjust the sliders subtly until you achieve the desired skin tones in your image. For accurate skin tone painting, mix cadmium red, yellow ochre, and titanium white in equal parts to create a basic peach tone. Adjust the color by adding more red for warmer tones or more yellow for cooler tones. |
Using Photoshop For Skin Tone Corrections
Achieving flawless skin tones in Photoshop is possible with the help of color correction tools. Start by adjusting the white balance and adding warmth to the skin tone. Then, use selective color adjustment layers to tweak the magentas and yellows.
Avoid overcorrection and aim for natural-looking results.
To correct skin tones using color correction tools in Photoshop, you can use the selective color technique. First, adjust the white balance on the particular skin tone, then add a little warmth back into it. If you have a rough selection of the skin tone, adjust it on the selective color adjustment layer. Focus mainly on the magentas and yellows, then turn off the eye. Finally, adjust the contrast and texture on the skin tone. You can also match skin tones from different photos by selecting the red, yellow, or blue color channels in the selective color panel and adjusting one or more of the four sliders. Mix equal parts of cadmium red, yellow ochre, and titanium white to create a basic peach tone for accurate skin tone painting.
Practical Tips For Color Grading In Video Editing
To master the skin tone line in Premiere Pro, you can use masks and HSL Secondary in Lumetri. The Vectorscope tool helps you identify the skin tone line, and then you can create a mask around the skin area. With the HSL Secondary tool, you can then adjust the skin tones and make them look more natural. It is important to adjust mainly the magentas and yellows to get the desired skin tone. You can also adjust the skin temperature and contrast to enhance the overall look. When it comes to correcting skin tones in Photoshop, you can use the Selective Color panel and adjust the sliders for red, yellow, or blue channels to get the desired skin tone. For color correction in makeup, you can use different color correctors for redness, dark circles, dark spots, and sallowness.
Addressing Skin Tone Issues In Photography
Color correction tools in photography are essential for addressing skin tone issues. White balance adjustments play a crucial role in correcting skin tones. Adjusting the white balance can add warmth or coolness to the skin, enhancing the overall appearance of the subject in the photograph. In addition, utilizing selective color adjustment layers can help in fine-tuning skin tones. It’s important to understand the impact of different color channels and how they affect skin tones. In Photoshop, selecting the Red, Yellow, or Blue color channels and making subtle adjustments using the sliders can lead to desired skin tones in the image. When correcting skin tones, it’s also essential to consider using color correctors to neutralize redness, dark circles, dark spots, and sallowness. Understanding the fundamentals of color correction is crucial for achieving natural and accurate skin tones in photography.
Advanced Techniques For Perfect Skin Tones
When painting and mixing accurate skin tones in art, it’s important to protect and isolate skin tones during color grading. To correct skin tones in Photoshop, select the Red, Yellow, or Blue color channels in the Selective Color panel and adjust the sliders for subtle changes. When painting accurate skin tones, start by mixing equal parts of cadmium red, yellow ochre, and titanium white to create a basic peach tone. Then, adjust the color by adding more red for warmer skin tones or more yellow for cooler skin tones. For color correction makeup, use a green color corrector to neutralize red and pink tones, a peach color corrector for dark circles and dark spots, and a lavender color corrector for sallowness. By following these advanced techniques, you can achieve perfect skin tones in your art and photography.
Frequently Asked Questions
How Do I Find The Right Color Corrector For My Skin Tone?
To find the right color corrector for your skin tone, follow these tips: – For redness: Use a green color corrector to neutralize red and pink tones. – For dark circles and spots: If you have fair skin, use a peach color corrector.
If you have medium to dark skin, opt for a deeper orange shade. – For sallowness: Balance unwanted warmth with a lavender color corrector. Remember to adjust the color corrector based on your specific skin tone.
How Do You Color Correct Skin Tones In Photoshop?
To color correct skin tones in Photoshop, select the Red, Yellow, or Blue color channels in the Selective Color panel. Adjust the sliders until you achieve the desired skin tones. Mix equal parts of cadmium red, yellow ochre, and titanium white for a basic peach tone.
Add more red for warmer tones or more yellow for cooler tones. For darker skin tones, add a small amount of ultramarine blue or burnt sienna.
How To Correct Skin Tone In Photo?
To correct skin tone in a photo, use color correction tools in Photoshop. Adjust the red, yellow, or blue color channels and sliders to achieve the desired skin tones. Mix equal parts of red, yellow ochre, and white for a basic peach tone when painting.
How Do You Paint Accurate Skin Tone?
To paint accurate skin tone, mix cadmium red, yellow ochre, and titanium white for a basic peach tone. Adjust with more red for warmer tones or more yellow for cooler tones. For darker tones, add a bit of ultramarine blue or burnt sienna.
Experiment until you achieve the desired skin color.
Conclusion
Mastering the art of correcting skin tones using color correction tools is essential for achieving professional-looking photographs. By understanding the different color channels and adjusting sliders accordingly, you can achieve the desired skin tones in your images. Whether you are using Photoshop or other editing software, the process involves balancing out unwanted hues and enhancing the natural beauty of the skin.
With practice and experimentation, you can become proficient in correcting skin tones and elevate the overall quality of your photographs. So, grab your color correction tools and start creating stunning images with perfectly balanced skin tones.