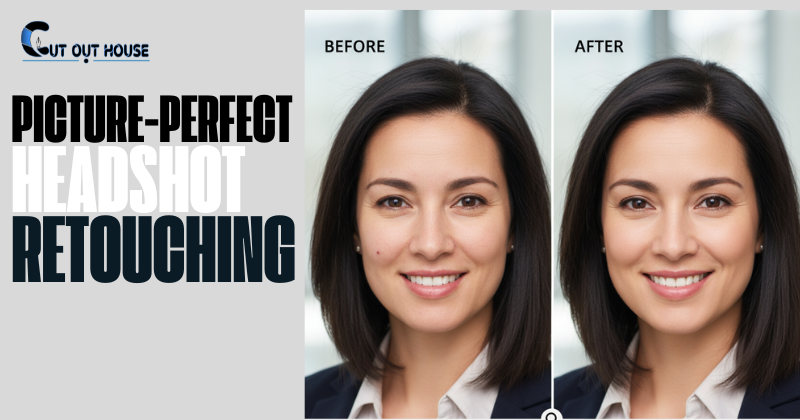
To correct skin tones using color correction tools, adjust hue, saturation, and luminance of individual colors. Use the Targeted Adjustment tool to click and drag directly on the subject’s face.
Achieving the perfect skin tone through color correction tools is essential for professional-looking photographs and videos. Whether you are using Adobe Lightroom, Photoshop, Premiere Pro, or other software, understanding how to manipulate colors accurately can greatly enhance your visuals. Correcting skin tones involves adjusting the hue, saturation, and luminance of specific colors to ensure a natural and balanced look.
By employing the right techniques and tools, you can achieve flawless skin tones, making your images and videos more visually appealing. Understanding the process of color correction and mastering the tools available in your preferred editing software is crucial for achieving the desired results.
Introduction To Color Correction
Learn how to correct skin tones using color correction tools effectively. Adjust hue, saturation, and luminance for perfect skin tones in your photos or videos. Master techniques in software like Adobe Lightroom, Photoshop, or Premiere Pro for professional results.
| Correcting skin tones is crucial for accurate color representation in photography. Color correction tools like Adobe Lightroom and Photoshop offer precise adjustments. Balancing skin tones enhances image quality and professionalism. Understanding the basics of color correction is essential for optimal results. Accurate skin tones create a natural and authentic look in photos. Utilizing tools like vectorscopes help in identifying and adjusting skin hues. Perfecting skin tones requires attention to detail and practice. Experimenting with different correction techniques improves skills. Consistent color correction elevates photographic outcomes. |
Essential Color Correction Tools
Color correction tools are essential for achieving accurate skin tones. Utilizing histograms and vectorscopes allows for precise adjustments. Software options such as Lightroom, Photoshop, and Premiere Pro provide versatile solutions for color correction. These tools enable users to fine-tune skin tones by adjusting hue, saturation, and luminance. Additionally, they offer the ability to isolate and enhance specific skin tones, ensuring a natural and balanced appearance. Understanding the intricacies of these color correction tools empowers users to create stunning visuals with lifelike skin tones.
Setting Up Your Workspace
When calibrating monitors for color accuracy, ensure that the brightness and contrast are adjusted correctly. Organize panels and toolsets to have quick access to color correction tools. Arrange the workspace to have a clutter-free environment, allowing you to focus on the skin tones and make precise adjustments.
Correcting Skin Tones In Adobe Lightroom
When it comes to correcting skin tones in Adobe Lightroom, one of the essential steps is to adjust the white balance. This can be achieved by utilizing the HSL/Color panel, where you can adjust the hue, saturation, and luminance of specific colors. To correct skin tones, you can adjust the temperature and tint sliders until the skin appears neutral and free from any unwanted color casts. You can also use the targeted adjustment tool to click on a specific area of the skin and adjust its color directly. With these color correction tools, you can achieve perfect skin tones in your photographs with ease.
Advanced Techniques In Adobe Photoshop
Correcting skin tones in Adobe Photoshop requires advanced techniques such as layer masks and selective color adjustment. Working with curves and levels helps to adjust skin tone. It is important to evaluate skin hue and analyze the luma waveform to correct skin tones that lean towards red. To isolate skin with a shape mask, adjust the white balance on a particular skin tone. Add a little warmth back into the skin tone and adjust mainly the magentas and yellows. Contrast and texture can be added to the skin tone by adjusting the selective color adjustment layer. These techniques are also applicable in other software like Adobe Lightroom, Premiere Pro, and Davinci Resolve.
Using Davinci Resolve For Skin Tones
Enhance skin tones using DaVinci Resolve’s color correction tools to achieve natural and balanced hues. Adjust color levels meticulously for flawless skin tones in your video projects.
| Using DaVinci Resolve for Skin Tones | Color grading with nodes |
| Leveraging scopes for skin tone correction |
Color correction tools in DaVinci Resolve offer a powerful way to correct skin tones. By using nodes, you can precisely adjust the color and tone of the skin. Additionally, leveraging scopes such as vectorscope and waveform monitor allows for accurate monitoring of skin tone levels. By making subtle adjustments to the hue, saturation, and luminance, you can achieve natural-looking skin tones in your footage. With the versatility of DaVinci Resolve, you have the tools at your disposal to perfect skin tones and enhance the overall visual appeal of your videos.
Practical Tips For Real-world Situations
When correcting skin tones in portraits, it’s essential to deal with mixed lighting effectively. In group shots, the challenge becomes even more pronounced, requiring a nuanced approach. It’s crucial to understand the differences in correcting skin tones between individual portraits and group settings. By mastering these nuances, you can ensure that skin tones appear natural and consistent across all subjects in the photograph. Paying attention to the color temperature and light sources in the environment is also crucial for achieving accurate skin tones in various lighting conditions. Additionally, utilizing color correction tools tailored for different scenarios can significantly improve the quality of your images.
Maintaining Natural Look While Correcting
Achieving a natural look while correcting skin tones using color correction tools is crucial for a flawless result. By carefully adjusting the hues and intensities of individual colors, you can effectively correct skin tones without sacrificing their natural appearance. Using tools like Adobe Lightroom, Photoshop, or Premiere Pro can help you achieve the perfect skin tone while maintaining a natural look.
| When correcting skin tones, maintain a natural look. |
| Avoid over-correction to prevent unnatural appearances. |
| Consistency across shots is crucial for a cohesive project. |
Frequently Asked Questions for Color Correction Tools
How To Color Correct Skin Tone?
To color correct skin tone, use color correction tools in software like Adobe Lightroom or Photoshop. Adjust hue, saturation, and luminance of individual colors to target and correct skin tones. Use the targeted adjustment tool to click and drag directly on the subject’s face for precise adjustments.
How Do You Color Correct Skin Tones In Photoshop?
To color correct skin tones in Photoshop, adjust hue and intensity using the Color Mixer drop-down. Change saturation and luminance of individual colors. Target specific skin tone colors with the Targeted Adjustment tool by clicking and dragging on the subject’s face.
How To Correct Skin Tone In Photo?
To correct skin tone in a photo, adjust hue, saturation, and luminance using color correction tools like Adobe Photoshop.
What Is Skin Color Correction?
Skin color correction is the process of using tinted makeup to neutralize skin tone imperfections.
Conclusion
Mastering color correction tools can transform skin tones effortlessly, enhancing your photos to perfection. With practice and patience, achieving natural and balanced skin tones is within reach. Remember, subtlety is key to maintaining authenticity in your edits. Take your skills further and watch your images come to life.