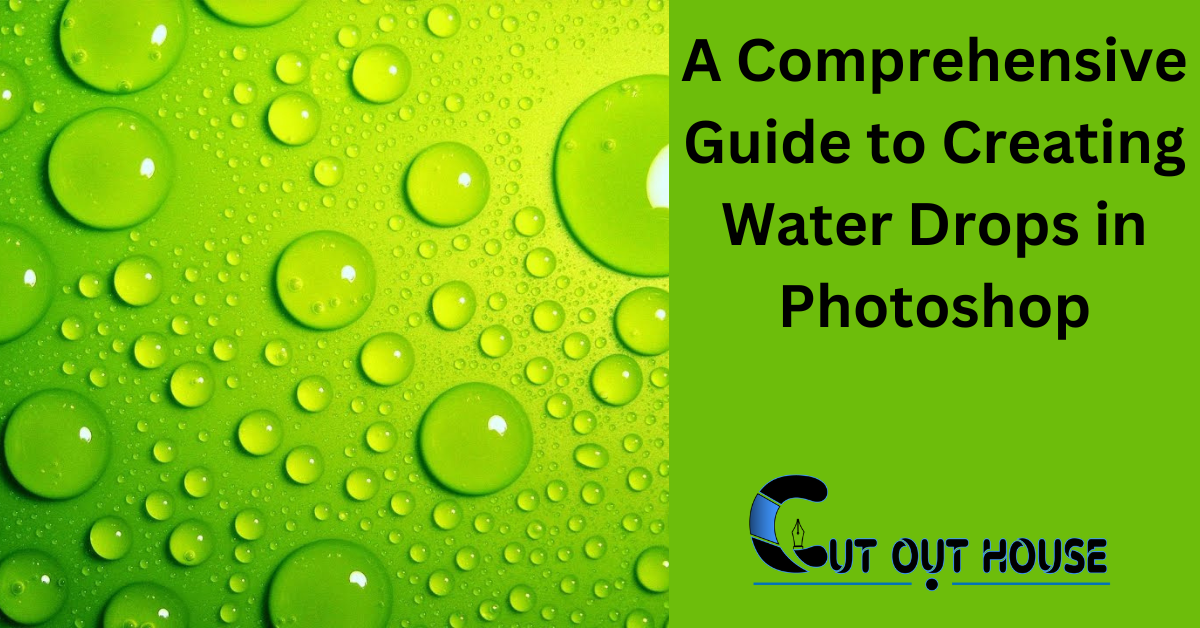
Learn to create realistic water drops in Photoshop with this comprehensive guide. Master the techniques for adding depth and dimension to your designs.
This tutorial will cover everything from creating a new layer to applying layer styles and adding highlights, giving you the skills to produce professional-looking water droplets in your photos and designs. Creating water droplets in Photoshop can add a realistic and captivating element to your images.
Whether you’re a photographer, graphic designer, or digital artist, mastering this skill can enhance the visual impact of your work. With the right tools and techniques, you can bring your creative vision to life and create stunning, lifelike water droplets that will captivate your audience. In this comprehensive guide, we will explore the step-by-step process of creating water drops in Photoshop, providing you with the knowledge and skills to elevate your design capabilities.
Introduction To Water Drops In Photoshop
Water drops are a popular design element in photography and graphic design. Fortunately, creating water drops in Photoshop is a relatively simple process. With a few tools and techniques, you can create realistic water drops that will add depth and texture to your designs.
The Magic Of Digital Water Drops
Digital water drops can be created to look almost identical to real water drops. You can control the size, shape, and color of the water drops to fit your specific design needs. Additionally, you can add other design elements such as reflections, shadows, and highlights to enhance the realism of the water drops.
Scope Of The Tutorial
This tutorial will provide a comprehensive guide to creating water drops in Photoshop. We will cover various techniques and tools, such as the Elliptical Marquee tool, Gradient Editor, Layer Styles, and Warp Tool. We will also discuss how to create asymmetrical water drops and how to create a raindrop effect. By the end of this tutorial, you will have the skills and knowledge to create water drops that will take your designs to the next level.
Essential Tools And Resources
|
When creating water drops in Photoshop, you’ll need a few essential tools and resources. First, let’s talk about the Photoshop tools. You’ll need the Elliptical Marquee tool to select the water drop shape. The Gradient Editor will be used to apply a gradient to the water drop. Layer Styles, such as drop shadow and inner shadow, will help add depth and realism to the water drop.
In addition to the Photoshop tools, it’s helpful to have external resources for textures and references. These can be found online, such as on websites like Adobe Stock or Shutterstock, where you can find high-quality water textures to use in your design. You can also find tutorials and guides on YouTube, like the ones from Blue Lightning TV Photoshop, that provide step-by-step instructions on creating realistic water drops.
Setting Up Your Canvas
To create realistic water drops in Photoshop, start by setting up your canvas. Create a new layer to work on, and choose the right background for your water drops. Consider using a dark or reflective surface to enhance the effect.
Crafting The Base Shape
To craft the base shape of water drops in Photoshop, start by using the Elliptical Marquee Tool to create a circular selection for the drop. Then, a gradient is applied to the selection to give it volume and depth. This will form the foundation for the realistic appearance of the water drop.
Adding Depth And Realism
Learn how to add depth and realism to your photos with a comprehensive guide on creating water drops in Photoshop. This step-by-step tutorial will show you how to make your images come to life with realistic water droplets, enhancing the visual impact of your photography.
Master this technique to take your editing skills to the next level.
To add depth and realism to water drops in Photoshop, consider using the Inner Shadow effect. This effect adds a shadow to the inside of the water drop, creating the illusion of depth. Additionally, using highlights and refractions can enhance the realism of the water drop. To create highlights, add a small reflection to the water drop using the Elliptical Marquee tool. To create refractions, enlarge the water drop and adjust the opacity to create a transparent effect. Applying layer styles such as drop shadow and gradient can also enhance the water drop’s appearance. Experiment with asymmetrical shapes and the liquified filter to create unique and realistic water drops.
Layer Styles For Realistic Effect
|
To create realistic water drops in Photoshop, layer styles are essential. One of the layer style settings that can be used for a realistic effect is Drop Shadow. Adjusting the opacity and size of the Drop Shadow can give the water drop a more three-dimensional look. Another technique is using Bevel and Emboss to add depth to the water drop. By adjusting the size, depth, and direction of the Bevel and Emboss, the water drop can appear more realistic. These layer styles can be combined with other techniques such as creating asymmetrical shapes, adding highlights and reflections, and warping the water drops to create a more unique effect. |
Fine-tuning The Water Drop
When creating water drops in Photoshop, fine-tuning the appearance is crucial. Adjusting the opacity and fill of the water drop layer is essential for achieving a realistic look. Resizing and distorting the drop can also contribute to a more natural appearance.
Advanced Water Drop Effects
Creating advanced water drop effects in Photoshop involves adding a ripple effect and magnification to drops. To create a ripple effect, use the Liquify Filter to distort the water surface around the drop. Adding magnification to drops requires duplicating the water drop layer, applying a Gaussian blur, and using the Transform tool to enlarge the droplet. Experiment with layer styles, gradients, and highlights to achieve a realistic and captivating water drop effect in your designs. Remember to adjust the lighting and shadows to enhance the three-dimensional appearance of the water drops.
Applying Water Drops To Various Surfaces
When it comes to applying water drops to various surfaces in Photoshop, it is important to adapt the drops to different textures. By integrating drops with the environment, you can create a more realistic effect. To achieve this, start by creating a new layer and making a selection with the Elliptical Marquee tool. Then, open the Gradient Editor and apply an inner shadow. Create a small highlight reflection and enlarge the water drop. For asymmetrical shapes, use the Warp Tool. Additionally, you can duplicate water droplets and resize them to add variation. By following these steps, you can create realistic water drops on different surfaces in Photoshop.
Best Practices For Realistic Water Drops
Learn how to create realistic water drops in Photoshop with this comprehensive guide. Discover the best practices for adding depth, highlights, and shadows to make your water drops look authentic. Master the art of creating natural-looking water droplets for your digital artwork or photography projects.
Creating realistic water drops in Photoshop requires proper layer organization and the ability to save and reuse layer styles. When working with layers, it’s important to keep them organized and labeled for easy editing and manipulation. Additionally, saving layer styles can save time and ensure consistency across multiple water drops. To create a water drop, start by creating a new layer and making a selection with the Elliptical Marquee tool. From there, apply an inner shadow and create a small highlight reflection. Enlarge the water drop and make it asymmetrical for a more realistic look. To create raindrops or water effects, consider adding noise, flipping the image vertically, and using displacement maps or filters. With these tips and techniques, creating realistic water drops in Photoshop can be a breeze.
Troubleshooting Common Issues
|
Troubleshooting Common Issues:
|
Final Touches And Exporting
When it comes to final touches and exporting your water drops in Photoshop, there are a few key steps to follow. First, it’s important to review your work and make any necessary adjustments. Take a close look at the water drops and ensure they appear realistic and visually appealing.
Next, you’ll want to prepare your image for both web and print. For web use, consider optimizing the file size without sacrificing image quality. This can be done by saving the image in a web-friendly format, such as JPEG or PNG, and adjusting the compression settings.
For print, you’ll need to ensure that your image has a high resolution and is saved in a suitable format, such as TIFF or PSD. Consider consulting a print professional or following specific print guidelines to achieve the best results.
Once you’ve reviewed your work and prepared it for web and print, you’re ready to export your final image. Choose the appropriate file format and settings based on your intended use, and save the image in a location of your choice.
Frequently Asked Questions
How To Create Raindrops In Photoshop?
To create raindrops in Photoshop, follow these steps: 1. Add a blank layer above the background and fill it with black. 2. Go to the Filter tab, choose Noise, and select Add Noise. 3. Use the Eraser Brush to remove unwanted parts.
4. Add a Displacement Map and Gaussian Filter for a realistic effect. This comprehensive guide will help you create stunning raindrop effects in Photoshop.
How To Make Water Effects In Photoshop?
To create water effects in Photoshop, follow these steps: 1. Duplicate the layer and flip the image vertically. 2. Scale down the flipped layer and move it below the original layer. 3. Use the eraser brush to remove unwanted parts. 4.
Add a displacement map for a realistic effect. 5. Apply a water ripple effect and a Gaussian filter for additional realism. These techniques will help you create stunning water effects in your Photoshop projects.
How Do You Make Water Droplets For Product Photography?
To create water droplets for product photography, you can use Adobe Photoshop. Start by creating a new layer and making a selection with the Elliptical Marquee tool. Apply a gradient, layer styles, and a drop shadow. Add a highlight and duplicate the droplets for a realistic effect.
You can also use the Liquify filter to change the shape of the droplets.
How Do You Make A Water Wave Effect In Photoshop?
To create a water wave effect in Photoshop, follow these steps: 1. Create a new layer. 2. Use the Elliptical Marquee tool to make a selection. 3. Open the Gradient Editor and apply an inner shadow. 4. Create a small highlight reflection.
5. Enlarge the water drop and make it asymmetrical in shape. By following these steps, you can achieve a realistic water wave effect in Photoshop.
Conclusion
In this comprehensive guide, we have explored the process of creating water drops in Photoshop. Through step-by-step instructions and helpful tips, you have learned how to achieve realistic and eye-catching water droplets in your designs. By following the techniques outlined in this guide, you can add depth, texture, and visual interest to your artwork.
Experiment with different shapes, sizes, and gradients to create unique water droplets that enhance the overall aesthetic of your designs. With practice, you will master the art of creating water drops in Photoshop and elevate your design skills to the next level.