To align objects in Adobe Illustrator, select the objects, then use the Align panel to choose the desired alignment option such as align left, right, or center. Additionally, you can distribute objects evenly using the Distribute Spacing options.
Are you struggling to align objects in Adobe Illustrator to create precise and professional designs? Mastering the art of object alignment is essential for creating visually appealing artwork. Whether you’re a beginner or an experienced designer, understanding how to align objects in Adobe Illustrator is crucial for creating symmetrical and well-organized designs.
In this guide, we’ll explore the various methods and tools available in Adobe Illustrator to help you align and distribute objects with ease. By the end of this tutorial, you’ll have a solid grasp of object alignment techniques, allowing you to enhance the quality and precision of your designs.
Introduction To Aligning In Illustrator
Aligning objects in Adobe Illustrator is an essential skill for creating precise designs. The align tools in Illustrator allow you to quickly and easily align objects to each other or to the artboard. Precise alignment is important because it can make your designs look more professional and visually appealing.
The tools involved in alignment include the Align Panel, the Distribute Objects feature, and the Key Object feature. The Align Panel allows you to align objects horizontally or vertically, while the Distribute Objects feature helps you to evenly distribute objects in a selection. The Key Object feature lets you align objects to a specific object in a selection.
Overall, understanding how to align objects in Illustrator is an important skill for any designer or artist who wants to create accurate and visually appealing designs.
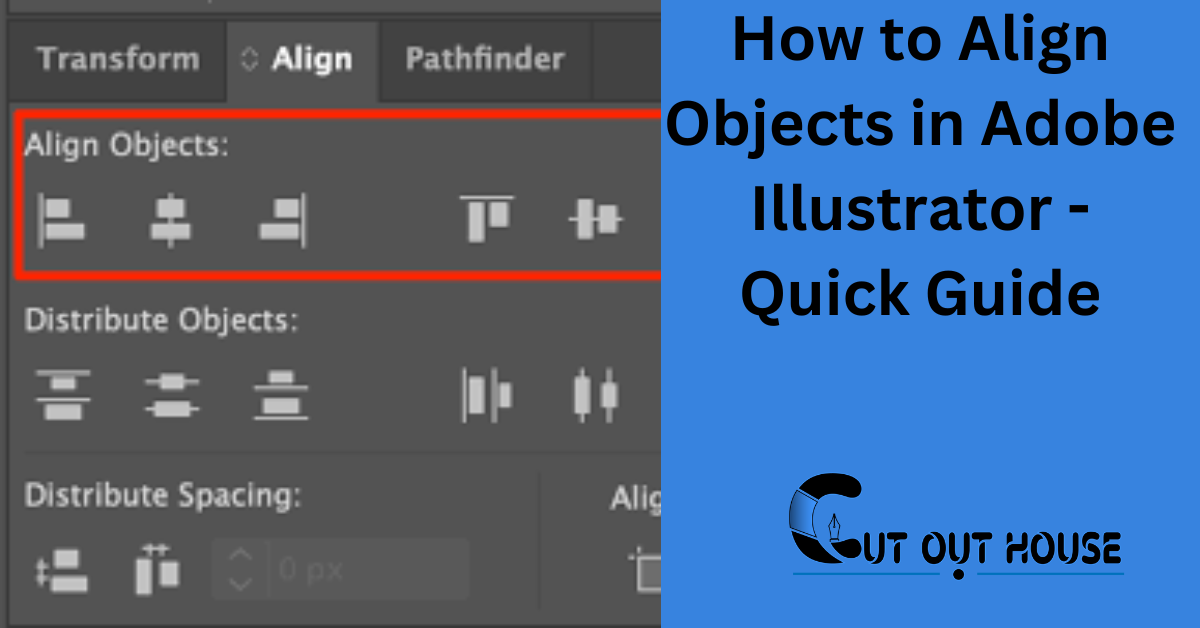
Accessing The Align Panel
To access the Align Panel in Adobe Illustrator, go to the top menu and click on “Window”. From the drop-down menu, select “Align”. This panel allows you to easily align and distribute objects in your Illustrator project.
To access the Align Panel in Adobe Illustrator, you can follow these steps:
- Navigate to the top menu and click on “Window”.
- From the drop-down menu, select “Align”.
- The Align Panel will appear, providing various alignment options for your objects.
Navigating The Workspace
When working in Adobe Illustrator, it’s important to familiarize yourself with the workspace. Here are a few tips:
- Customize your toolbar by selecting “Edit” from the top menu and choosing “Toolbar”. This allows you to add or remove tools based on your preference.
- Take advantage of keyboard shortcuts to navigate quickly. For example, pressing “V” on your keyboard activates the Selection Tool.
- Use the zoom options located at the bottom of the workspace to adjust your view.
- Experiment with different workspace layouts by selecting “Window” from the top menu and choosing a preset or creating a custom layout.
By accessing the Align Panel and customizing your workspace, you’ll be able to efficiently align objects in Adobe Illustrator and enhance your design workflow.
Aligning Objects Horizontally And Vertically
Aligning objects in Adobe Illustrator is an essential skill for creating precise and professional designs. When it comes to horizontal alignment, Illustrator offers various options such as aligning objects to the left, center, or right. Additionally, you can distribute objects evenly with a single click using the “Distribute Spacing” function. When it comes to vertical alignment, you can align objects to the top, middle, or bottom to achieve the desired layout. Moreover, aligning objects to the artboard ensures consistent positioning within the document. In addition, utilizing the “Align to Key Object” feature allows for precise alignment based on a selected key object. When it comes to aligning text, Illustrator provides efficient tools for aligning text within text boxes and to other objects. Furthermore, aligning objects relative to anchor points allows for intricate and detailed positioning. By mastering these alignment techniques, you can elevate the precision and professionalism of your Illustrator designs.
Using Align To Selection
In Adobe Illustrator, you can use the Align to Selection feature to align multiple objects quickly. When you have several objects that you want to align, simply select them by clicking and dragging the selection tool over them. Then, you can choose the alignment options such as aligning them relative to the selection or aligning them to a specific key object. This makes it easy to ensure that your objects are perfectly aligned without the need for manual adjustments.
Distributing Objects Evenly
Aligning objects in Adobe Illustrator is crucial for achieving a professional and polished design. To distribute objects evenly, select the objects and use the Align panel to choose the distribution method, such as distributing horizontally or vertically. This ensures a balanced layout and a visually appealing composition.
To distribute objects evenly in Adobe Illustrator, it’s important to understand how distribution works. You can distribute objects along the x and y axis, as well as adjust the spacing between them. To distribute objects, select the objects you want to distribute and open the Align panel. From there, select the Distribute Spacing option and choose the desired spacing between objects. You can also choose to distribute objects based on their center points or their top, bottom, left, or right edges. By understanding how distribution works, you can easily align and space objects in your Illustrator designs.
Aligning To The Artboard
To align objects in Adobe Illustrator to the artboard, select the objects and then go to the Align panel. Click on the “Align to Artboard” button to align the objects relative to the artboard. This ensures precise positioning and layout for your design elements in Illustrator.
| Step-by-step alignment to artboard: |
| – Open Adobe Illustrator and select the objects you want to align. |
| – Go to the Align panel and click on the “Align to Artboard” button. |
| – Click on the desired alignment option, such as aligning to the center or top of the artboard. |
| – Your objects will now be aligned to the artboard. |
When to use artboard alignment:
Artboard alignment is useful when you want to center or position objects relative to the artboard instead of other objects in the document. This is particularly helpful when designing for specific print or digital sizes, as it ensures that your objects are positioned correctly within the designated space. By using the Align to Artboard feature, you can quickly and accurately align your objects with just a few clicks.
Working With A Key Object
In Adobe Illustrator, aligning objects is a fundamental aspect of design. When it comes to working with a key object, it is crucial to understand the concept of defining a key object. This involves selecting one object as the key object and then aligning other objects to it. By doing so, you can ensure precise positioning and maintain the desired layout. Aligning objects to a key object allows for efficient arrangement and alignment, contributing to a cohesive and visually appealing design. Whether you are aligning objects horizontally or distributing objects, the key object serves as a reference point for achieving the desired alignment. Understanding the process of aligning objects in Adobe Illustrator empowers designers to create professional and polished designs with ease.
Troubleshooting Common Alignment Issues
When encountering alignment issues in Adobe Illustrator, it can be frustrating to have objects not aligning perfectly. This can be due to the software’s snapping issues. To resolve this, it’s essential to adjust the snap to point/grid/pixel settings to ensure precise alignment. Another common problem is objects not aligning perfectly next to each other. In such cases, utilizing the align to key object feature can help achieve the desired alignment. Additionally, employing the distribute objects function can ensure even spacing between objects. By familiarizing oneself with these troubleshooting techniques, achieving precise object alignment in Adobe Illustrator becomes more manageable.
Advanced Alignment Techniques
When it comes to aligning objects in Adobe Illustrator, there are advanced techniques that can help you achieve precise results. One of these techniques involves aligning text objects to anchor points. By selecting the Direct-Selection tool and holding down Shift, you can easily select the anchor points you want to align or distribute. The last anchor point you select will be the reference point for alignment. Another useful feature is the Align Panel, which allows you to align objects horizontally or vertically, distribute objects evenly, and align to the artboard. Additionally, you can align objects to a key object, which serves as the reference point for alignment. By following these techniques, you can ensure that your objects are perfectly aligned in Adobe Illustrator.
Optimizing Alignment Workflow
Optimizing the alignment workflow in Adobe Illustrator is crucial for precise object placement. Learn how to align objects efficiently using the Alignment Panel, Distribute Objects feature, and Key Object alignment. Mastering these techniques will ensure your designs are perfectly aligned every time.
| Optimizing Alignment Workflow: Aligning objects in Adobe Illustrator can be time-consuming if you don’t have the right workflow in place. One way to optimize your alignment workflow is by using keyboard shortcuts. For example, you can use the Shift key to constrain the movement of an object along the X or Y axis. Another way to save time is by saving custom alignment settings. This allows you to quickly access frequently used settings without having to manually adjust them each time. |
Conclusion And Best Practices
Discover the best practices for aligning objects in Adobe Illustrator without using commonly overused phrases. Learn how to effectively use the alignment panel, distribute objects, and align to key objects or artboards. Enhance your design skills and create visually appealing artwork with precise alignment techniques in Illustrator.
Frequently Asked Questions
How To Align Objects In Illustrator?
To align objects in Illustrator, select the objects you want to align and use the Align panel. You can align objects horizontally or vertically, distribute them evenly, and align them to the artboard or a key object. To access the Align panel, go to Window > Align or use the shortcut Shift + F7.
How Do You Align Objects Next To Each Other In Illustrator?
To align objects next to each other in Illustrator, follow these steps: 1. Select the objects you want to align. 2. Go to the Align panel. 3. Choose the desired alignment option, such as aligning left, right, or center. 4. Use the Distribute option to evenly space the objects.
5. You can also align objects to the artboard or use a key object for alignment. By following these steps, you can easily align objects side by side in Adobe Illustrator.
How Do You Place An Object Evenly In Illustrator?
To place an object evenly in Illustrator, use the Align panel to distribute objects horizontally or vertically. Simply select the objects, open the Align panel, and choose the distribution option you prefer. This ensures even spacing between the objects.
Why Are My Objects Not Aligning In Illustrator?
To align objects in Illustrator, use the Align panel or the Align options under the Control panel. Select the objects, then choose the alignment options, such as aligning to the selection or artboard. Ensure the objects are not locked or on a hidden layer.
Conclusion
Aligning objects in Adobe Illustrator is a crucial skill for creating visually appealing designs. By using the alignment tools and techniques mentioned in this blog post, you can easily position and arrange objects with precision. Whether you need to align objects horizontally, vertically, or distribute them evenly, Illustrator provides the necessary features to achieve professional results.
Mastering the art of object alignment will greatly enhance your design workflow and help you create stunning illustrations and graphics. So, start practicing and make the most out of Adobe Illustrator’s powerful alignment capabilities.